
Karma manifests itself differently for everyone. Me? I have parking karma. No matter how busy the street, the mall, the whatever, there is always a parking spot for me very close to the door. Which is good, since I'm usually toting a kid or two, maybe a dog, and invariably some other armful of something that I'm picking up or dropping off. I am very happy with the way that karma returns it's blessings to me, and when the parking spots start to dwindle, I know I'm either being a jerk, or it's time to build up my karmic stash again, and I better get busy.
***********
Griffin goes to daycare with a little dude named Jackson. Griffin and Jackson are buddies, but they are very similar in personalities - both headstrong, stubborn and the bruisers of the bunch, so they sometimes end up butting heads, often literally. I have a soft spot for Jackson though, I see a lot of Griffin in him - he's a true rough and tumble boy, with a heart of gold underneath that tough exterior.
Jackson is also one of those kids who has the unfortunate privilege of knowing the inside of Sick Kids Hospital way too well. He has Hydrocephalus, and has had more surgeries in his short three years than most of us will have in a lifetime. Or three lifetimes. So when his mom sent out an email looking for donations for a silent auction to benefit Hydrocephalus research at Sick Kids, I knew I had to help.
 This quilt was more than a silent auction prize for me. I challenged myself to free-motion quilt the entire thing, which I have never done before, and I couldn't be happier with the results. I started it plenty in advance, spent some time picking out some GREAT fabric, took my time, and did it all right, with no shortcuts, and no rushing to finish.
  I tried (and think I succeeded) to make this quilt gender neutral, to make it more appealing to everyone. I used every last scrap of the 6 fat quarters that I purchased, and carried it over onto the back with a quilted strip that I love love love!
 I feel like I've taken my quilting skills to the next level with this quilt, and I'm stoked to do more. I have a pile of fabric upstairs that I bought two years ago to make a quilt for Griffin, and now I'm glad that I waited to cut into it. I also have a stack of fabric ready for Corben, and I'm excited about it too. (SOCK MONKEYS!) And as a result of posting the quilt photos, I have requests for more!
 I'm glad I took up the challenge to make this quilt. It's brought me to a new place in my quilting journey. It's hopefully going to fetch a pretty penny at the silent auction and benefit a great cause. And, I figure it should be good for a few really good parking spots!


 On your 14" wide bottom, decide where baby's head is going to go, and thus, where his feet will go (ie: pick a top and a bottom.) On the head end, from about 8" on either side of your 14" sandwich, fold down about 3/4" of fabric and sew down, creating a channel for some elastic. Insert the elastic, stitch down on one end, and then gather the fabric down to about 6" total. (This seems like a lot of gathering, but it'll hang better this way, and baby's head will be slightly elevated.) Sew the other end of the elastic down. Trim off the excess.
 On the foot end we're going to sew some ties. I used bias tape, and just stitched it closed. For each tie, I used 13" of tape, and just knotted the end.
 (I do know how to measure, I didn't realize my tape had slipped when I went to take the picture!)

 Thread the fabric into your "U" shaped slots in the wood. Again, another bias tape tie around the wood and the fabric. (I saw a few versions that had these ties sewn on, but I'd recommend not doing that until you see how your hammock hangs and you figure out exactly where you want them.)
  Insert Baby. Bounce. He sleeps, you blog, everyone wins!
 (Information gathered from a whole bunch of places...mostly from
  There is so much organization happening in this room, I hardly know what to do with myself!
 What I found was some
 Insane? Quite likely. But I'm going to do it. Or die trying!
 The last thing I want to do in the room is to put up a quilt design wall...I just did a little trolling on the
  And, last but certainly not least, introducing my new favourite sewing room accessory:
 Isn't he the cutest??!!!


 Then, these ADORABLE quilted pot holders. Don't you just love them?
 And then, there is the apron. Can I tell you how
 My swap package came from
  Thank you, thank you Shannon! You have made one little boy, and his Mama, very happy campers!!
 (Wanna see what I made for my partner? It's
  So now at least Widdle Dude is warm, under a fancy new Widdle Dude sized quilt. Neglected still, but maybe a tiny bit less so. I'm thinking about making him a teddy bear next...poor little guy!


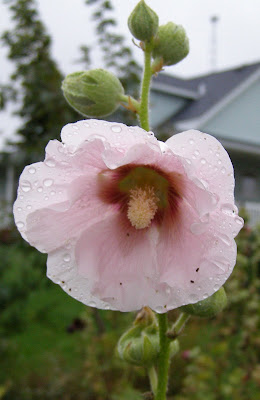 WET hollyhocks, bigger than the house!
 After my little wander, it was back into the depths of the basement, to work on a project that I have been thinking about for weeks. A bag, all for me. I was planning on this being a stash-buster, all from what I had in house. Then I went to the quilt store in town this afternoon, and fell in love with a little pile of fat quarters that would not stop CALLING MY NAME!! So I obliged them, took them home, and here's what they ended up as:


